build_embed_linux_system
附录六: 系统平台常见问题总结
- 修改内核logo显示
- systemd增加自定义服务方法
- 指定console输出接口(串口或者屏幕)
- 开机启动延时一段时间执行脚本
- nfs启动显示为Read-Only FileSystem
- 什么是核隔离,如何让系统支持核隔离
- 内核支持usb wifi芯片,并且开机自启动方法
- 修改系统输出由uart1切换到uart3
- 如何管理Linux硬盘分区,例如支持data,recovery分区
feature-001
- 系统启动后加载的界面文件所在的目录为kernel/drivers/video/logo, 其中*.ppm格式文件就是转换需要使用得ppm文件
- 在微软商店下载GIMP,添加一张图片=>图像=>模式=>索引颜色转换=>最大颜色数量设置为(224), 设置分辨率大小,并导出
- 选择导出格式为ppm,保存格式为ASCII将转换好的图片文件拷贝到 drivers\video\logo目录下,比如:logo_user_clut224.ppm //必须加clut224导出
- 修改Kconfig文件
vi drivers/video/logo/Kconfig

#===============================================
# ++++++
config LOGO_USER_CLUT224
        bool "Standard224-color User logo"
        default y
#===============================================
- 修改Makefile文件
vi drivers/video/logo/Makefile

#===============================================
# ++++++
obj-$(CONFIG_LOGO_USER_CLUT224)  += logo_user_clut224.o
#===============================================
- 修改开机logo图片数据管理文件logo.c
vi drivers/video/logo/logo.c

//==============================================
// ++++++
#ifdef  CONFIG_LOGO_LUO_CLUT224
    /* Generic Linux logo */
    logo = &logo_user_clut224;
#endif
//===============================================
``

- 添加头文件申明

```c
vi include/linux/linux_logo.h

//==============================================
// ++++++
extern const struct linux_logo logo_user_clut224;
//==============================================
- 在终端编译,在执行menuconfig时,修改内核配置选项。
DeviceDrivers  --->
  Graphics support  --->

Bootup logo  --->
    ---Bootup logo
    [ ] Standard black and whiteLinux logo
    [ ] Standard 16-color Linux logo
    [ ] Standard 224-color Linuxlogo

 Standard 224-color  hanbo logo (NEW)  (修改)
feature-002
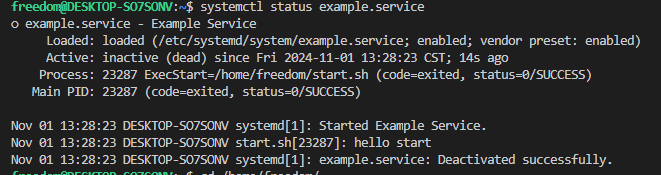
systemd增加自启动服务方法。
Systemd是目前主流的Linux启动机制,其定义一套完整的系统启动和管理的解决方案。Systemd的默认service路径为”/etc/systemd/system/”,当启动后,会在”/lib/systemd/system”目录下创建链接,实现启动时运行。Systemd的应用配合systemctrl命令,可以实现服务使能/关闭,服务启动/停止,服务状态查询等功能,service的文件格式如下所示。
cd /etc/systemd/system

sudo vim example.service
#############################################################
[Unit]
Description=Example Service
After=network.target

[Service]
ExecStart=/home/freedom/start.sh
WorkingDirectory=/tmp/
Restart=always

[Install]
WantedBy=multi-user.target
#############################################################

# 创建启动脚本
cd /home/freedom
sudo vim start.sh
#############################################################
#!/bin/bash

echo "hello start"
#############################################################
chmod 777 start.sh

# 使能服务(链接到/lib/systemd/system,启动时加载)
sudo systemctl enable example.service

# 当前启动example.service
sudo systemctl start example.service

# 查看service运行状态
systemctl status example.service
加载成功后,状态如下所示.
注意:shell脚本首行要指定使用的shell平台,例如bash脚本则为”#!/bin/bash”,否则脚本会执行失败。
feature-003
指定console输出接口(串口或者屏幕)。
- 指定console输出kernel信息到屏幕
setenv bootargs "console=tty1 console=ttymxc0,115200 panic=5 rootwait root=/dev/mmcblk0p2 earlyprintk rw"
- buildroot指定console在系统中支持输出(不期望应用层输出打印,可不执行这一步)
# 修改/etc/inittab, 增加tty1
ttymxc0::respawn:/sbin/getty -L  ttymxc0 0 vt100 # GENERIC_SERIAL
tty1::respawn:/sbin/getty -L  tty1 0 vt100 # GENERIC_SERIAL, 增加显示
- debian,uboot指定console在系统中支持输出
# 复制串口ttymxc0启动服务,所有步骤完成
cd /etc/systemd/system/getty.target.wants

#[ TIME ] Timed out waiting for device dev-ttymxc0.device.
# 如果是其它芯片,需要将ttymxc0更新为相应的串口,否则会失去命令行打印
cp -d getty@tty1.service getty@ttymxc0.service
feature-004
开机启动延时一段时间执行。
对于busybox管理的系统,在rcS中添加后台执行的脚本。
在启动脚本中添加执行脚本。
vi  /etc/init.d/rcS

#########################################
# 添加后台启动脚本
/home/sys/shell/bringup_shell.sh &
#########################################
定义脚本内容,设置延时执行时间
# 修改bringup_shell.sh脚本
mkdir /home/sys/shell
vi /home/sys/shell/bringup_shell.sh

#########################################
#!/bin/sh

echo "start bash"
sleep 2s
/home/sys/start_app.sh
#########################################

# 设置脚本可执行
chmod 777 /home/sys/shell/bringup_shell.sh
对于debian系统,添加到系统service中。
feature-005
nfs系统创建文件报错: can’t create directory ‘dir’: Read-only file system.
原因: bootargs配置中缺少rw选项,需要添加。
# 更新/dev/nfs支持rw
setenv bootargs 'console=ttymxc0,115200 root=/dev/nfs rw nfsroot=192.168.1.25:[nfsdir] ip=192.168.2.34:192.168.2.29:192.168.2.1:255.255.255.0::eth0:off'

# 仅当次修改解决
mount rw -o remount /
feature-006
什么是核隔离,如何让系统支持核隔离。
在Linux系统中,核隔离(也称为CPU隔离或CPU pinning)是一种将特定的任务或进程绑定到特定的CPU核心上的技术。这可以提高系统性能,尤其是在需要实时响应的应用中。如果需要核隔离,首先确保芯片为多核才有意义,实现核隔离的方法如下所示。
- 通过修改U-Boot中的bootargs,确保内核支持核隔离功能
# 增加核隔离相关说明
setenv bootargs "console=ttymxc0,115200 panic=5 rootwait root=/dev/mmcblk1p2 earlyprintk rw isolcpus=1-3"
- 使用taskset命令,将进程或线程绑定到特定的CPU核上
- 启动新进程并绑定到特定CPU核心:taskset -c 0,1 command。这将把command进程绑定到CPU 0和1上运行。
-
将已有进程绑定到特定CPU核心:首先使用ps -ef grep process_name获取进程的PID,然后使用taskset -p -c 0,1 PID将进程绑定到CPU 0和1上。
question-007
内核支持usb wifi芯片,并且开机自启动方法(本篇以Linux6.1内核,rtl8188eus为例)
-
首先需要获取usb wifi的驱动,一般去厂商的官网或者对应github下载(自己实现基本不可能,实现特别复杂),本例中支持Linux6.1内核的wifi驱动下载地址:https://github.com/aircrack-ng/rtl8188eus
-
将目录放置在drivers/net/wireless/reltek/rtwifi/目录下,修改配置文件
# drviers/net/wireless/reltek/Kconfig
# 增加
source "drivers/net/wireless/realtek/rtlwifi/rtl8188eus/Kconfig"

# drviers/net/wireless/reltek/rtwifi/Makefile
# 增加
obj-$(CONFIG_RTL8188EU) += rtl8188eus/
- 编译增加CONFIG_RTL8188EU=y选项
编译内核,将RTL8188EUS设备插入即可工作。
wlan启动并开启自启动的方法详细见文档:wpa_supplicant交叉编译和使用方法
question-008
修改系统输出由uart1切换到uart3。
更换串口模块,包含u-boot,bootargs, kernel和rootfs。
- U-Boot模块修改
// 设备树节点
// arch/boot/dts/imx6ul-14x14-rmk.dtsi
chosen {
    stdout-path = &uart3;
};

&uart3 {
    pinctrl-names = "default";
    pinctrl-0 = <&pinctrl_uart3>;
    status = "okay";
};

// include/configs/mx6ullrmk.h
#define CONFIG_MXC_UART_BASE    UART3_BASE

// board/freescale/mx6ullrmk/mx6ullrmk.c
static iomux_v3_cfg_t const uart3_pads[] = {
    MX6_PAD_UART3_TX_DATA__UART3_DCE_TX | MUX_PAD_CTRL(UART_PAD_CTRL),
    MX6_PAD_UART3_RX_DATA__UART3_DCE_RX | MUX_PAD_CTRL(UART_PAD_CTRL),
};

static void setup_iomux_uart(void)
{
    //setup uart1 pins
    imx_iomux_v3_setup_multiple_pads(uart1_pads, ARRAY_SIZE(uart1_pads));

    //setup uart3 pins
    imx_iomux_v3_setup_multiple_pads(uart3_pads, ARRAY_SIZE(uart3_pads));
}
- bootargs修改
setenv bootargs "console=ttymxc2,115200 root=/dev/nfs nfsroot=${serverip}:${nfspath},proto=tcp,nfsvers=3 rw ip=${ipaddr}:${serverip}:${gateway}:${netmask}::eth0:off earlyprintk loglevel=${printk_level}"
- kernel修改
// 设备树节点
// arch/boot/dts/imx6ul-14x14-rmk.dtsi
chosen {
    stdout-path = &uart3;
};

&uart3 {
    pinctrl-names = "default";
    pinctrl-0 = <&pinctrl_uart3>;
    status = "okay";
};
- rootfs修改
对于busybox构建的sysvinit文件系统。
# /etc/inittab
ttymxc2::respawn:/sbin/getty -L  ttymxc2 0 vt100 # GENERIC_SERIAL
对于debain和ubuntu使用systemd文件系统
cd /etc/systemd/system/getty.target.wants

rm getty@ttymxc0.service

cp -d getty@tty1.service getty@ttymxc2.service
主要修改如上。
question-009
如何管理Linux硬盘分区,例如支持data,recovery分区(imx6ull mmc或者sd卡为例)。
首先要明白一点,对于嵌入式Linux来说,硬盘分区除了对u-boot的起始地址,以及env的地址有明确定义外,其它的分区和大小只要满足最低的容量需求,是可以任意分区的,不过这也引起了新的问题,如何找到相应分区,这就涉及之前讲解过的设备地址文件,如/dev/mmcblk1p2,其中2就是所在分区的编号。那么如何实现呢。
对于SD卡比较简单,参考附录一:I.MX6ULL平台SDK操作和移植说明, SD卡下载方法的说明,分区中增加相应块即可。
对于emmc,则需要修改mgtool来支持文件,这里说下mgtool实现原理。
- mgtool连接后,通过usb下载支持UTP的固件到sdram中,跳转执行
- 通过UTP协议,传递命令(在ucl2.xml中实现)到内核中,并执行
- 通过命令完成emmc分盘,文件下载导入和同步功能
如果希望emmc支持,主要修改以下部分。
- 修改mksdcard.sh,增加分区
# 增加32M的userdata分区
sfdisk --force ${node} << EOF
${BOOT_ROM_SIZE}M,128M,c
138M,32M,83
200M,,83
write
EOF
- 修改传递的命令
<LIST name="eMMC" desc="Choose eMMC as media">
    <!-- ...... -->

    <!-- create partition -->
    <CMD state="Updater" type="push" body="send" file="mksdcard.sh">Sending partition shell</CMD>
    <CMD state="Updater" type="push" body="$ chmod 777 $FILE "> Partitioning...</CMD>
    <CMD state="Updater" type="push" body="$ cp $FILE mksdcard.sh "> Partitioning...</CMD>
    <CMD state="Updater" type="push" body="$ sh mksdcard.sh /dev/mmcblk1"> Partitioning...</CMD>

    <!-- ...... -->

    <!-- format and mount rootfs partition -->
    <CMD state="Updater" type="push" body="$ mkfs.ext3 -F -E nodiscard /dev/mmcblk1p2">Formatting rootfs partition</CMD>
    <CMD state="Updater" type="push" body="$ mkdir -p /mnt/mmcblk1p2"/>
    <CMD state="Updater" type="push" body="$ mount -t ext3 /dev/mmcblk1p2 /mnt/mmcblk1p2"/>

    <CMD state="Updater" type="push" body="$ mkfs.ext3 -F -E nodiscard /dev/mmcblk1p3">Formatting rootfs partition</CMD>
    <CMD state="Updater" type="push" body="$ mkdir -p /mnt/mmcblk1p3"/>
    <CMD state="Updater" type="push" body="$ mount -t ext3 /dev/mmcblk1p3 /mnt/mmcblk1p3"/>

    <!-- burn rootfs -->
    <CMD state="Updater" type="push" body="pipe tar -jxv -C /mnt/mmcblk1p3" file="files/filesystem/rootfs.tar.bz2" ifdev="MX6ULL">Sending and writting rootfs</CMD>
    <CMD state="Updater" type="push" body="frf">Finishing rootfs write</CMD>
    <CMD state="Updater" type="push" body="send" file="files/modules/modules.tar.bz2" ifdev="MX6ULL">Sending Modules file</CMD>
    <CMD state="Updater" type="push" body="$ mkdir -p /mnt/mmcblk1p3/lib/modules">Mkdir -p /mnt/mmcblk1p3/lib/modules</CMD>
    <CMD state="Updater" type="push" body="$ tar jxf $FILE -C /mnt/mmcblk1p3/lib/modules/" ifdev="MX6ULL">tar Modules file</CMD>
    <CMD state="Updater" type="push" body="$ sleep 1">delay</CMD>
    <CMD state="Updater" type="push" body="$ sync">Sync...</CMD>
    <CMD state="Updater" type="push" body="$ umount /mnt/mmcblk1p3">Unmounting rootfs partition</CMD>
    <CMD state="Updater" type="push" body="$ echo Update Complete!">Done</CMD>
</LIST>
- 修改bootargs适配新的文件系统地址
setenv bootargs "console=ttymxc0,115200 panic=5 rootwait root=/dev/mmcblk1p3 earlyprintk rw"
相应文件如下所示。